Cast Stone Cill Installation Guide
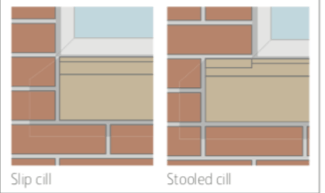
Cast Stone Cills come in different types and are used for different applications. The type of cill used is often down to personal preference but also based on the type of wall/construction and location of the window from the front of the wall. The two types of Cast Stone Cills we stock at Click Cast Stone are plain stooled cills and plain slip cills.

In this blog we take you step-by-step through the process of how to install your Cast Stone Cill.
- Slip Cill Installation Guide
- Stooled Cill Installation Guide
- Jointed Stooled Cills Installation Guide
Cast Stone Slip Cill Installation Guide
Cast Stone Slip Cills are designed to fit between window reveals and our Cills are available in one piece, in lengths up to 1547mm (dependent on unit height). Where the window opening is too large to have two Stooled Cills, a Slip Cill can be introduced between the two to make up the difference. It is crucial that movement of cast stone components is accommodated.

How to Install Slip Cills
To avoid stress, Cast Stone Window Cills should be installed as per the following guidance:

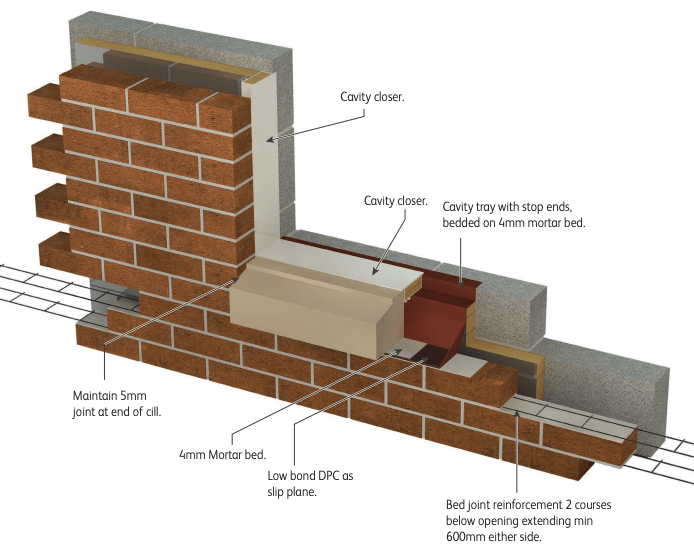
- At the window opening sit the cavity tray (with stop ends), on a 4mm mortar bed.
- Place an additional length of DPC (damp proof course) material on top of the exterior leaf surface of the cavity tray. This acts as a slip plane.
- Compressible or tube-style weep vents must be placed at the end of the cavity tray.
- On top of the second DPC layer place a further 4mm of mortar and carefully place the cill in position.
- The front of the cill should project 50mm from the front of the masonry or render below.
- To maintain free movement at the cill ends, insert backing cord above the weep vent and apply flexible sealant the same colour as the surrounding mortar or stone colour. Avoid pointing mortar as it will restrict movement.
Generally, when laying cast stone products mortar strength should not exceed designation (iii) 1:1:5/6 Cement: lime: sand. The use of lime is desirable to accommodate movement. Cracking can occur if mortar of a higher strength than recommended is used or if movement of the cill is restricted by mortar pointing.
For further information see our Installation Guide No 1 found on the Forticrete website www.forticrete.co.uk/resources
Stooled Cill Installation Guide
Cast Stone Stooled Cills are designed to be used so each end appears to support masonry on each side of window openings. Masonry reveals can be formed using brick, stone block, quoins, or jambs. A stooling gives a smooth, flat surface for brickwork to sit level. It is crucial that movement of cast stone components is accommodated.

How to Install one-piece Stooled Cills
To avoid stress, a Stooled Cill should be installed according to the process listed below.
For standard one-piece Stooled Cills up to 1547mm long:

- At the window opening, sit the cavity tray 20mm wider than the cill (with stop ends) on a 4mm mortar bed. Note, the window opening will be narrower than the cill unit.
- Place weep vents at each ends of the cavity tray.
- Place a shorter section of low bond DPC material on top of the outer leaf surface of the cavity tray to act as a slip plane. Place at each end under the stool profile positions only.
- Place a further 4mm mortar on top of the second DPC (damp proof course) layer. This is to be positioned under the stool end only and carefully place the cill in position. (The front of the window cill should project 50mm from the facing masonry).
- Free movement of the stooled cill must be achieved before forming the masonry reveal. A 4mm mortar bed is placed on the surface of the stool and smoothed off. Once hardened, a section of the low bond DPC is placed on the smoothed mortar. This needs to cover the mortar on the stooling and the side of the cill as well.
- Add the mortar on the surface of the DPC bed only. Construction of masonry reveals to be continued, ensuring bed joints are aligned and plumb the surrounding area.
- Towards the end of construction, a compressible backing cord is inserted into the gap between bedded stool ends under the cill, and at the ends of the cill above the weep vents.
- When considering an appropriate pointing solution, movement of different materials can be accommodated more effectively with a mastic or flexible joint sealant which would also prevent water penetration caused by mortar shrinkage.
Jointed Stone Stooled Cill Installation
How to Install Jointed Stooled Cills
Stooled Cills exceeding 1547mm (depending on height) will be supplied in sections. To install jointed Stooled Cills, follow the procedure below:
- Follow the general guidance for the one piece stooled cills. However, where the jointed sections meet add a further section of DPC on the outer leaf of the cavity tray. This should be large enough to sit under 150mm of each bearing and the mortared joint between.
- Place supporting mortar of a stiff consistency. This ensures minimal slump.
- Butter one central end of the unit and lay. Carefully insert the second section ensuring the cill is level along the full length.
- Ensure joint(s) where cill units meet are fully filled with mortar.
- Include additional weep vents at intervals no more than 1000mm before inserting the backing cord.
- Considering an appropriate pointing solution is crucial. Using a mastic or flexible joint sealant will accommodate movement of different materials. This is required for water penetration to be prevented which is caused by mortar shrinkage.

Generally, when laying cast stone products mortar strength should not exceed designation (iii), 1:1:5/6 Cement: lime: sand. The use of lime is desirable to accommodate movement. Cracking can occur if mortar of a higher strength than recommended is used or if movement of the cill is restricted by mortar pointing.
For further information see our Installation Guide No 2 found on the Forticrete website www.forticrete.co.uk/resources
Cast Stone Stooled and Slip Cills from Stock
Click Cast Stone provide quality products manufactured by market leader Forticrete. All our cast stone Window Cills are available to buy from stock online.
Enquire today about our Stone Slip and Stooled Cills by emailing [email protected]. Contact us to speak to our technical advisors by calling us 01909 775 000. All cast stone products purchased online are delivered within 4 working days when selecting express delivery.